We've moved!
Please visit
Template:Sticky - Custom
From The TimeSplitters Wiki
m |
m |
||
| Line 1: | Line 1: | ||
<div style="float: left; border: solid #8eadce 1px; margin: 1px"> | <div style="float: left; border: solid #8eadce 1px; margin: 1px"> | ||
{| cellspacing="0" style="width: 238px; background: {{{4}}}" | {| cellspacing="0" style="width: 238px; background: {{{4}}}" | ||
| - | | style="width: 45px; height: 45px; background: {{{3}}}; text-align: center; font-size: 14pt" | {{{1}}} | + | | style="width: 45px; height: 45px; background: {{{3}}}; text-align: center; font-size: 14pt" | '''{{{1}}}''' |
| style="font-size: 8pt; padding: 4pt; line-height: 1.25em" | {{{2}}} | | style="font-size: 8pt; padding: 4pt; line-height: 1.25em" | {{{2}}} | ||
|}</div> | |}</div> | ||
Revision as of 17:14, 27 July 2007
| {{{1}}} | {{{2}}} |
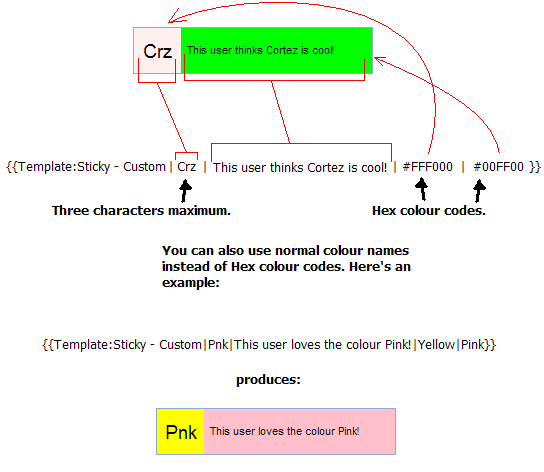
This is a custom sticky for alternative stickies that are not already made. You must specify the colours used and the content of the box like so:
Contents |
Use
Use the code:
{{Template:Sticky - Custom|3 Character Symbol|Sticky Content|Colour of Left part|Main sticky colour}}
Standard Example
Using a picture
You can also use a picture instead of the 3 characters in the left part of the sticky. The image should be no larger than 30x30 pixels. We recommend you save the image as a PNG file or GIF file, these formats are small in size and you can make them transparent aswell.
To put a picture in your custom sticky, simplay paste the URL of the image into the part where you'd normally put the 3 character symbol, like so:
{{Template:Sticky - Custom|URL of Image|Sticky Content|Colour of Left part|Main sticky colour}}
Help
If you still can't figure out how to use the custom sticky, feel free to ask an Admin.

