Template Tutorial
From Sonar
Contents |
Project and Track Templates Tutorial
When you create a new project in SONAR, you have an option to select a template for your new file. The "Normal" template that is selected by default contains a couple of blank MIDI and audio tracks, and a couple of busses. Although SONAR comes with a good variety of project templates to get you started, this feature really comes into its own when you take the time to make your own personalised template. This tutorial guides you through the process, with suggestions of what to include.
Existing Templates
To make use of an existing template, simply choose from the list that is displayed in the New Project File dialog.
There is quite a large collection of existing templates, many of which you are never likely to use. It might be worth moving some of them to a backup folder, so that your list only contains the ones you use on a regular basis.
Creating Your Own Template
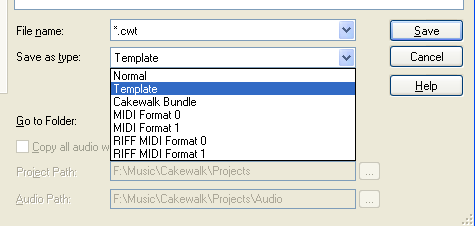
Any SONAR project can be saved as a template. Simply create a new project, customise it to your liking, and then choose File|Save As. In the Save as Type drop-down box, choose "Template"
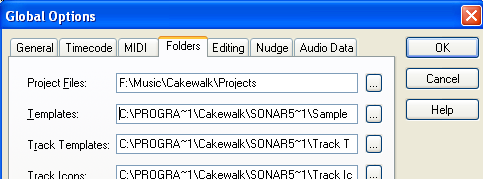
You will need to make sure you save the template (.cwt) file in the SONAR templates directory. You can see where this is by looking at the Options|Global|Folders setting.
Ideas for Inclusion in a Project Template
- Audio Tracks - Create an audio track for each instrument or vocal part you would typically record. Rename the track and set its inputs to the appropriate mono or stereo vocal track.
- MIDI Tracks - Create a MIDI track for each instrument part you would typically record in MIDI. Give each one its own channel number and set its output to the appropriate MIDI out port. You could also adjust its panning or key transposition.
- Track Icons - Make use of the extensive collection of track icons included with SONAR or the ones here on the SONAR Wiki to help you quickly visually identify which track is which.
- Track Folders - Group tracks together logically with track folders.
- Busses - Create as many submix or effect busses as you like, and add appropriate sends to each track.
- Effects - You can pre-load effects into the clip bins of tracks or busses. For example, you might load your favourite compressor and EQ into a vocal track, and a reverb onto an aux bus. You can also load them up with appropriate presets to save even more time.
- Virtual Instruments - For those who work with MIDI and virtual instruments, having a few bread and butter sounds such as drums, piano, bass, strings, synth lead etc can save a lot of time. Load your favourite virtual instruments into the synth rack and set them to appropriate presets.
- Drum Maps - Drum maps are a great time-saver but can be a pain to set up. Create a drum map and assign it to a MIDI track.
- Sysex - You can record any sysex messages to get your external MIDI equipment set up just how you want it on every project.
- Metronome Settings - Set up the metronome to your favourite settings
- Instrument Definitions - Set up instrument definitions and assign them to MIDI ports
- Track Manager - use the track manager to hide unwanted tracks by default in the console or track views.
- Clip Colors - you can customise the clip colors each track will use
- Click track - you don't have to use the metronome. You can record a MIDI or audio loop with a basic drum-beat or a click and repeat it a few hundred times, so that you have a click track you can mute and unmute on the fly.
- Automation - if you always use volume, pan, or send level envelopes on a track, save yourself some time by setting them up in advance.
- Customise Views - You can customise any of the views to your taste. For example, you might hide the navigator or track inspector in the track view, change the default controls shown on each track in the console view, and change the default snap to grid setting in the piano roll view.
- Default Settings - You don't have to have a default tempo of 100 and default meter of 4/4 if you don't want. You could create a 6/8 140bpm template if you want.
- Spare Parts - You can pre-load your project with MIDI or audio clips that you commonly use. For example, you might have some MIDI clips of drum flams or rolls on a muted track ready to drag into an active drum track.
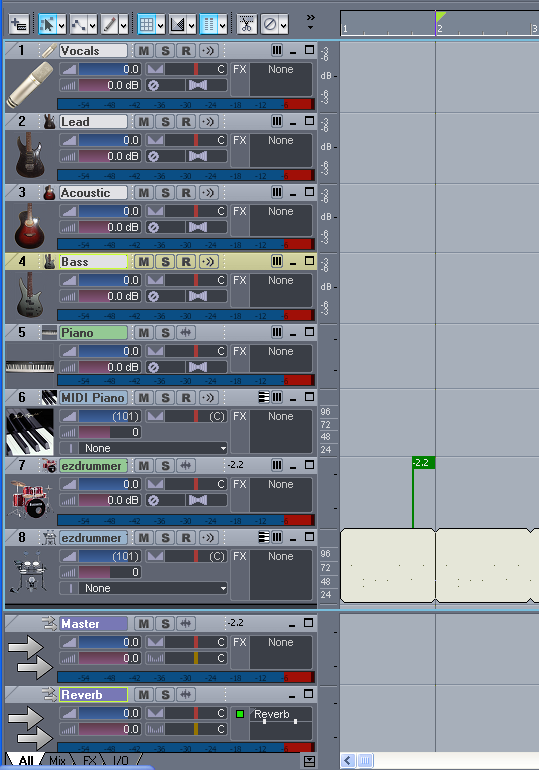
As you can see from this list, there is potential to save yourself a lot of time if you take the trouble to set up a good project template. Here's a screenshot of a fairly basic project template that includes a few audio tracks for my most commonly recorded instruments, and a two tracks for piano and drum virtual instruments with corresponding MIDI tracks.
Track Templates
As well as project templates, SONAR offers track template capability. This saves you from having to decide in advance what tracks you will need in your project template. You can save audio tracks complete with effects patched in, and you can even save groups of tracks such as a MIDI track patched to a virtual instrument loaded with a preset.
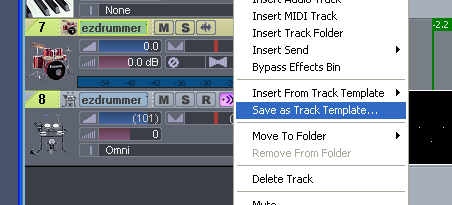
To save a track template, simply select the track or tracks you want to save, then right-click and select Save as Template. You can organise your track templates into sub-folders to make them easy to navigate when adding tracks from templates.
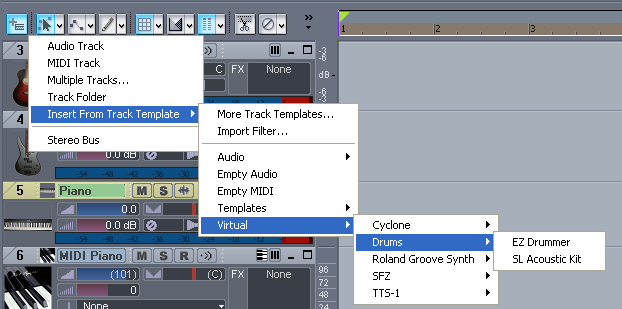
To create new tracks from track templates, simply click the add track icon in the track view and browse down the submenus to the track you want.
Potential Pitfall 1 - Drum map settings are not saved when saving a MIDI track as a track template. Potential Pitfall 2 - Although SONAR comes with a good selection of track templates, most cannot be used by users of SONAR 5 Studio edition as they make use of the per-track EQ feature of SONAR 5 Producer edition. It is expected that this problem does not exist in SONAR 6 Studio edition (anyone confirm this?).
Starting Points
There are a number of ways you can get started creating project templates.
- Start with a blank project, customise it and save as a template
- Open an existing custom template and improve it. You will find from time to time you need to make updates to your own custom templates.
- SONAR Forum member Jonas has made a great mixing template available on his website.
- Start with an existing project. If you have a really good project where you had everthing set up just the way you wanted it, then load the project, strip out all the unnecessary bits such as audio and MIDI data and markers and then save it as a template.

