Sonar Workflow - Multisesson Tracking Loopback Latency
From Sonar
Contents |
Sample Accurate Recording With Loop-back Latency
Introduction
Imagine you have a killer drummer playing along with a beat (an audio loop for example). You record their performance, and it sounds very tight while recording -- very tight timing. Now when you play both tracks back, it sounds OK, but there is this feeling that the groove is gone. It no longer sounds tight. It no longer feels "in the pocket" like it was when recording. This is a common problem with DAW hardware and software on computers, and is caused by loop-back latency that was incorrectly compensated for.
Loop-back latency is the time it takes for sound to play back out of a computer into the analog world and loop-back into the computer to be recorded again. This is a real and finite latency. If everything is perfect in the system, this loop-back latency is compensated for and the recorded track lines up perfectly with the playback track; giving us a sample accurate recording. That is to say that the loop-back latency still exists but the various tracks in the DAW software line up accurate to the sample. When the loop-back latency isn't perfectly compensated for we end up with a loop-back offset.
This problem is also often referred to as loop back delay, recording latency, recording offset, and recording timing delay.
List of Terms
- Multi-session Tracking: recording a new instrument while playing along with a previously recorded instruments or sounds in a multitrack environment.
- Loop-back Latency: time delay of an audio signal caused by a the process of digital to analog and analog to digital conversions (DAC & ADC) and any functions of the ADC/DAC related hardware and their software drivers.
- Loop-back Offset: when loop-back latency is not fully compensated for and therefore results in offsets between tracks when multisession tracking.
- Sample Accurate Recording: when loop-back latency is fully compensated for, resulting in no loop-back offset. The loop-back tracks line up perfectly with each the original tracks -- they line up 'to the sample'
Concerns
This is an issue that can happen with any DAW software. This is because it is generally caused by the drivers for the sound interface (soundcard) not reporting the true loop-back latency so the DAW software can compensate properly. There a number of reasons that this happens that we won't worry about here. The point is that you need to measure your DAW's actual compensated loop-back latency and correct for it if needed.
Loop-back offsets on the order of a few milliseconds are nothing to be concerned about for standard multi-session tracking since we can't hear when different instruments are off by that amount. So, sample accurate recording isn't an absolute requirement. Much more than a few milliseconds and songs just don't sound tight. A bit more than that and something is obviously very wrong. [Since this is all somewhat subjective no numbers were used.]
However, there are instances where sample accurate recording may be desired. Routing tracks out of the digital domain for external processing of some sort and then recording them back into the DAW software could have adverse affects. Some examples of this are re-amping, utilizing external effects processors, reverb chambers, or reverb plates. People commonly put a pre-delay on reverb anyhow, so the latency offset in those cases shouldn't be a problem. It could however confuse the issue if the latency offset is large enough.
Problem scenarios:
- Several DAC to ADC conversions (or other delays of some sort) add enough overall loop-back latency that the final track is delayed from the rest of the tracks enough to be heard as a timing issue between the tracks.
- IF re-amping, or utilizing external effects processors, reverb chambers, or reverb plates: the loop-back track is mixed in with the original track. Depending on the contents of the loop-back track, this mixing could add undesired phase distortion.
Measuring Loopback Offset In Sonar
- Start Sonar project with a few empty audio tracks.
- Run "Options -> Audio -> General -> Wave Profiler", if needed.
- Set Time Ruler Format to Samples"
- Turn off Snap to Grid mode.
- Import or record a short section of a percussive sound like a kick drum. The simplest thing to do is enable the "Audio Metronome " and loop that back into Sonar to record it. Any way that you do it, call this Original Track. What is needed here is something that shows up as tall pulses in the track view. This way you have something easy to identify when comparing the loopback track to the recorded track.
- Route Original Track to play back through audio interface.
- Use a mixer or cable audio interface so that the output of Original Track loops back to an input track.
- Enable for Recording an empty track in Sonar to record the input track from previous step.
- Record. You now have both an Original Track and a Loop-back Track.
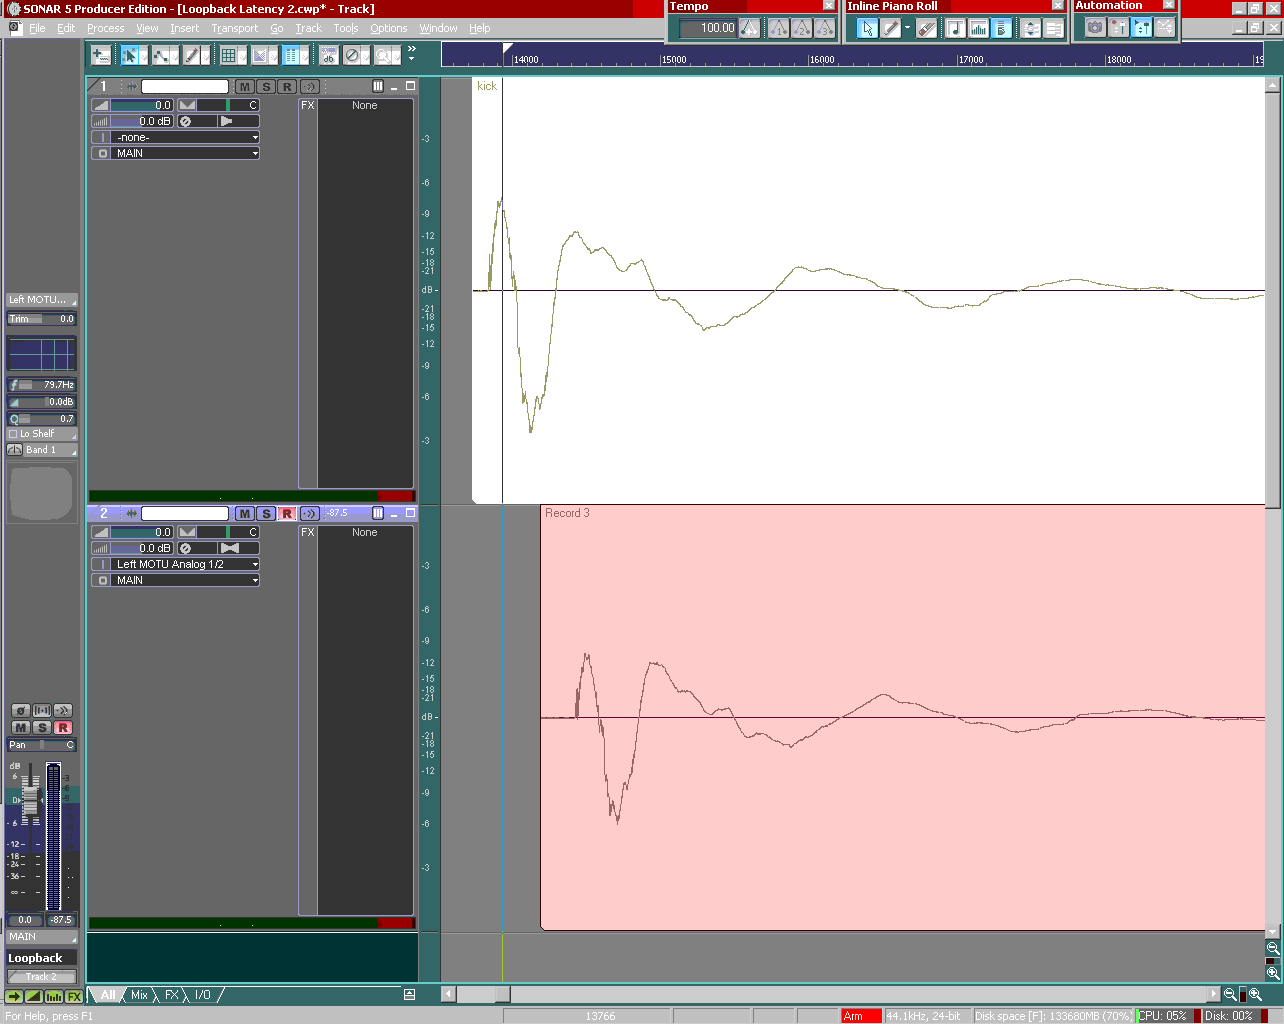
- Zoom in on the two tracks so that you can see the loopback offset.
- Zoom in on the FIRST PULSE of the Original Track so that you can locate a point. Choose a point that is also obviously visiable on both the Original Track and the Loop-back Track.
- Place Now Time Marker over that obviously repeatable point on the Original Track and zoom in until you can see the exact sample number of your Now Time Marker location in the Time Ruler. This is the Original Track Sample Location.
- Place Now Time Marker over the same obviously repeatable point on the FIRST PULSE of the Loop-back Track. Zoom in until you can see the exact sample number of your Now Time Marker location in the Time Ruler. This is the Loop-back Track Sample Location.
- Finally calculate your offset: simply subtrack the Loop-back Track Sample Location from the Original Track Sample Location. This is your Latency Offset in number of samples.
- Now use your Correcting Loop-back Offset method below to correct the recorded track to make sure the tracks line up with your measured value.
Click This Text For Full Size Picture

Click This Text For Full Size Picture

Click For This Text Full Size Picture

NOTE:
If you ever change DMA buffer sizes, or "Samples per Buffer" in your audio interface driver, you'll have to do this test for each setting you use. This setting can change the loop-back offset. Also, if you change driver version or driver type (ASIO, DMA, MME) for your audio interface, you'll have to retest the loop-back offset.
The author has only done this one on 1 audio interface (MOTU 896) and has found that the "Samples per Buffer" is the only setting that affects the loopback offset (must rerun Wave Profiler when change this or offset will be very wrong). Other interfaces may have other settings that affect the loopback offset and may use different terminology besides "Samples per Buffer". For the MOTU, the "Samples per Buffer" always translates to "DMA Buffer Sizes" in Sonar under "Options -> Audio -> Driver Profiles" after the Wave Profiler is run.
Correcting Loop-back Offset
This is how you use the measured latency offset number of samples calculated above to eliminate loop-back offset (See your Sonar help for more information).
Based On Sonar Version
- Sonar 6: Enter the latency offset number of samples under "Options-> Audio-> Advanced" in the "Record latency adjustment" field using samples. The correction should be automatic from here on. Test it by recording a new loopback track to make sure it's good enough for you needs!
- Sonar 4 & 5: Enter latency offset number of samples in the Nudge configuration, and manually nudge tracks every time you record. Nudge configuration is under "Options -> Global -> Nudge". Test it by recording a new loopback track to make sure it's good enough for you needs!
- Sonar 3 and Older: Enable "Snap to Grid" and configure it for "Absolute Time" in "Samples" and enter the latency offset number of samples. Select "Mode" "Move By". Now when you record new tracks, zoom in on the beginning of them, select them and manually move them over one "Snap". Test it by recording a new loopback track to make sure it's good enough for you needs!
Alternate Correcting Methods
(Usable in any version, but only needed for Sonar 3 or older)
I. Type Offset In Each Clip's Properties
If you commonly use the "Snap to Grid" for other things and don't want to reconfigure it each time you record here is another way, but it is more work.
CALCULATING: you only need to do once (for each DMA buffer size you use) and remember the results: convert the # of samples to a time:
Divide the "latency offset number of samples" by "Sample Rate" (in Samples per Second) that you are running in. Example of 1128 samples & 44.1 kHz sampling rate:
1128/44100 = .02557 seconds = 25.6 milliseconds loop-back offset
APPLYING: now each time you record a track alternate-click on the recorded track and select "Clip-Properties". Subtract the loop-back offset from the "Start" time in that panel. Enter the resulting value in the "Start" time and click "OK" The track will now be moved over.
II. Use Software Plug in
Use a software plug in for each track as needed to compensate. Downside is a reduction is CPU processing power. Example:
Measured Results
Enter your measured loopback offsets here. This will help to categorize various interfaces for everyone's benefit.
Interface: Motu 896
User: Xavier
Sonar5
Driver Type: WDM (V3.4)
Sample Rate: 44.1 Khz
Buffer Size: 512
Loopback Offset: 1128 samples (25.6 mS)
Interface: Motu 896
User: Xavier
Sonar5
Driver Type: WDM (V3.4)
Sample Rate: 44.1 Khz
Buffer Size: 96
Loopback Offset: 295 samples (6.7 mS)
Interface: Motu 896
User: Xavier
Sonar5
Driver Type: ASIO (V3.4)
Sample Rate: 44.1 Khz
Buffer Size: 96
Loopback Offset: 103 samples (2.3 mS) [records with GAPS!!!]
Interface: RME Fireface 800
User: Xavier
Sonar6
Driver Type: ASIO (V2.42)
Sample Rate: 44.1 Khz
Buffer Size: 96, 512, 768, & 1024 [get distortion at other sizes]
Loopback Offset: 96 samples (2.2 mS)
Note: with Sonar 6 "ASIO Reported Latency" enabled.
Credits
Thanks for djkepi for making many of us first aware of this problem by providing the article at http://www.djkepi.com/latency/. Part of the opening introduction is a reworded version of his introduction.
Xavier 20:57, 23 November 2006 (EST)
