Tutorials:Switches The Musical
From Charas Project
Written By: Warxe PhoenixBlade
Difficulty: ***
Contents |
Introduction
Switches are one of those things that you need. It's pretty much impossible to have an RM project without switches - they're just so damn useful. However, if you're new to RPG Maker, you probably don't know how they work. That's fine - that's why this exists! Hopefully, it should give you an idea of what you're doing.
Getting Started
It's recommended that you know at least a bit about the maker before you start the tutorial, but it's not required. But jt to make sure we're on the same page, here's some terminology that I'll be using (note that I'll be using the RPG Advocate translation of RM2K3):
Event - An event is exactly what the name states - something that happens. Exactly what happens in an event is up to the user, making events the primary tool to move the story forward in an RPG Maker project. In Event Editing mode (hit F7 on the keyboard), double-click on any free space to create a new event.
Event Commands - This is a list of possible "commands" that you can put into an event. You can access this window by double-clicking on the <> symbol in an event. The Event Commands window has 3 or 4 pages, depending on the version of RM you're using. I won't bother explaining them all - that's a job for another tutorial.
Command - This is what any of the functions from the Event Commands window is called (for example, the first function, Message, is called a Message command). Commands are the driving force behind events, since without commands, events don't really have a use.
"What is a switch?"
To put it simply - a switch is like any other switch in the real world. For example, I like to draw parallels between an RM switch and a light switch - in your house, turning on a light switch allows electricity to pass through a wire and into the lightbulb, allowing you to see much better in the room. RM switches work in a similar way - they can control when two things come into contact with each other. Yet, a switch is useless on its own - if you have a light switch in your hand, not connected to anything, it's not going to do a whole lot when you turn it on (other than possibly amuse younger children and animals). RM switches are the same way - you have to have other events reference certain switches, to give them a purpose. "But how do you do that, Mr. Warxe?" Well, that's why I'm here. Hopefully, by the end of the tutorial, you'll be enlightened to the many uses of switches.
Using a Switch
Of course, the only way to see how powerful a switch is is to put it into action. So, the first thing we need to do is create a switch. Go into Event Editing Mode (hit F7 when in the main window of RM, or click the icon of a yellow square with a mouse pointer in it), and create a new event. You don't have to name it if you don't want, but I'm going to name it "Green", so make sure you know what I'm talking about when I say Green.
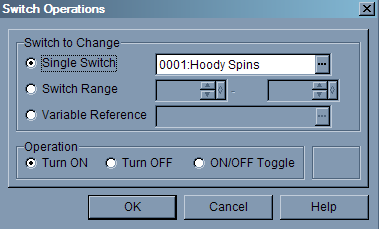
Anyways, once in the Green event, double-click the <> icon to open the Event Commands window. On Page 1 (which it should automatically be on), look for a command called either "Switch Operation" or "Change Switch" (If you can't find it, it's the sixth command on the left of Page 1). It should open a window that looks something like this (although you may not have the Switch Range option if you're using RM2K):
Different Options In a Switch
Since there's a few different options in a switch, I figured I'd make a subsection explaining each option:
"Switch to Change" section
Single Switch - This option will allow you to select a single switch to modify. You'll probably use this the most of any option for this particular command, so get used to it.
Switch Range - Like I said before, this option only appears in RM2K3 and possibly RMXP. It allows you to turn on several switches at once, which is more useful when dealing with more advanced events (for example, a switch puzzle)
Variable Reference - This allows you to turn a switch on based on the value of a variable. That's probably a bit advanced for you right now, so don't worry about it too much.
"Operation" section
ON - This changes the switch(es) specified in the above section to the "ON" position. Along with the Single Switch option above, this is the most frequent combo you'll be using Switch Operations for. Note that you can't turn a switch on twice - once in the ON position, turning it ON again is meaningless.
OFF - This turns the switch(es) specified to OFF. Switches are OFF by default, so this isn't very useful, unless you're doing some sort of puzzle.
ON/OFF TOGGLE - Like the name suggests, this will change a switch between its two states - if a switch is ON, choosing this command will turn it OFF, and vice versa. Again, it does have its uses, but you probably won't need to use it a whole lot.
The Choose Switch Window
"But what happens when you press the '...' button?" Well, a window like this pops up:
This is called "The Choose Switch window", even though it's only labelled Switches. This window has four components:
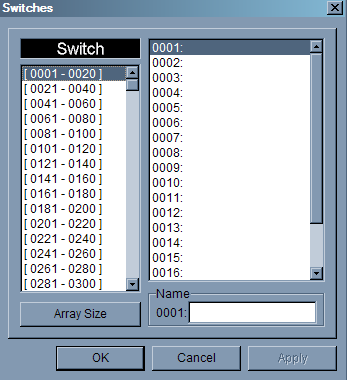
The Left Window - This displays switches in groups of 20 - it's used for navigation purposes, so that you don't have to scroll through a giant list of switches to find the one you want.
The Right Window - When you've clicked a section in the Left Window, this displays the group of 20 switches. This is where you can actually select a switch.
The "Name" box - This allows you to label your switches. I highly recommend labeling your switches, as it makes it easier to remember which switches are used and which aren't.
The "Array Size" button - By default, you only have 100 switches. So what happens when you've used them all? Well, you can click this button to increase how many total switches you have (up to a maximum of 5000). Though useful, having extra unused switches takes up more space on your hard drive, so try not to have too many extra at a time.
Well, now that those are done with, we can actually do stuff with them. Go into the Choose Switch window, and choose a switch. I'm going to label it "Blue", so if you label it something different, make sure you know what I'm talking about. Make sure that the Operation is set to "ON", and hit OK. In the event, it should now say:
| RPGM Code: |
| Event: Green <>Switch Operation: Switch[0001:Blue] ON <> |
or something similar to that.
Well, we've turned a switch on. Hooray! But, like I said before, it doesn't have much use on its own. We need to give it a use.
To do that, first click the New Page button. It's a big button labelled "New Page" with a "P" in a box beside it. This will create a new page in the event. In Page 2 of the event, take a look at the Preconditions box:

Notice how the first two options have "Switch" and "is ON" right beside them? Well, select one of them (I generally use the top one), and it will highlight it and fill in the box with a name. Click the "..." button, which will open the Choose Switch window, and select the switch that you turned on in the previous page (Blue). By doing that, you've just told the event "Only activate Page 2 when the Blue switch is ON." That little statement has a ton of potential, which I'll describe in the section below.
Applications of Switches - The Treasure Chest Example
Have you ever had the problem where you create a treasure chest event, but you can't get it to disappear afterwards? Maybe you tried using the Erase Event command, but that just makes it come back once you exit the map. So how do you get rid of it permanently?
Well, that's where switches come in. By turning a switch ON after obtaining the item, and having a second (blank) page with the Preconditions set to that switch ON, you can effectively get the item once and only once!
I'll walk you through it. First, create a new event, and call it "Chest". Set the graphic to a treasure chest of some sort, and leave every other option on the left side of the event window.
The first command should be an Item Management/Add Item command which adds the desired item (a potion, for example). Following that, there could be a "Play Sound Effect" command which plays a short jingle to signify you've found something. And after that, a message command saying "You've found a Potion! What luck!" or something. After all of that, create a Switch Operation that sets a switch called "Treasure Chest" to the ON position. Create a second page via the New Page button, and set the first precondition to "Treasure Chest". Leave the commands blank, and change the graphic of the chest to the first blank graphic in the *Tileset 1 section. Alternatively, you could change the graphic to an opened chest, and have a Message command saying "It's been opened already".
If you've followed that correctly, the pages should look something like this: Page 1 Page 2
With the knowledge to do that, coding in RM should become much easier.
Outro
Well, that's my tutorial on how to use switches. If you have any questions, ask in the talk page. All comments are appreciated, even if it's just "This tut's great!".
If you want to use this on your own website, you're free to, but do either one of the following: -Contact me at cloak.draknitis (at) gmail.com -Put "Originally written by Warxe PhoenixBlade" at the top
And, as usual, thanks for reading!
