BOR Manual
From Beats Of Rage
Fight'nWords (Talk | contribs) (Original Beats Of Rage Manual Version 1.2) |
Fight'nWords (Talk | contribs) |
||
| Line 18: | Line 18: | ||
|- | |- | ||
| width="200" align="left" valign="middle" | type enemy | | width="200" align="left" valign="middle" | type enemy | ||
| - | | align="left" valign="middle" | Write "enemy" to make an enemy, "player" for a hero, "obstacle" for | + | | align="left" valign="middle" | Write "enemy" to make an enemy, "player" for a hero, "obstacle" for boxes etc., "item" for items (apple, 1up etc.), and "none" for things as stream. |
|- | |- | ||
| width="200" align="left" valign="middle" | shadow 4 | | width="200" align="left" valign="middle" | shadow 4 | ||
| Line 285: | Line 285: | ||
|} | |} | ||
| - | <br /><br /> If you use a scene consisting of only one image (for instance "thank you for playing"), make sure that you give it a delay, using a gif animation program. Otherwise the image will only appear for 1/10th of a second.<br /><br /> You can also change the introscreen and character select screen. These files can be found in data/bgs/. Please note that scenes and most screens do not need to be saved with the bor palette; they can have their own palette. However, you must make the first colour (index 0) black.<br /> The exception is the character select screen, which must have the bor palette (because your characters will appear on this screen, obviously). Also, screens where text is displayed should have your font's colours in their palettes at the correct | + | <br /><br /> If you use a scene consisting of only one image (for instance "thank you for playing"), make sure that you give it a delay, using a gif animation program. Otherwise the image will only appear for 1/10th of a second.<br /><br /> You can also change the introscreen and character select screen. These files can be found in data/bgs/. Please note that scenes and most screens do not need to be saved with the bor palette; they can have their own palette. However, you must make the first colour (index 0) black.<br /> The exception is the character select screen, which must have the bor palette (because your characters will appear on this screen, obviously). Also, screens where text is displayed should have your font's colours in their palettes at the correct indexes. <br /><br /><br /><u>Entering the scene in the game</u><br /> You can play these scenes in BOR by typing the location of the scene.txt in the \\data\\levels.txt. <br /><br />''' Example '''<br />''scene data/scenes/ending.txt''<br /><br /><br /><br /> </center> |
<br /> | <br /> | ||
Revision as of 21:57, 24 April 2008
It is advised that you install the Beats of Rage edit pack in a subdirectory of your Beats of Rage installation.

This way, you can make your own mods for the game in the most effective way:
You can test your mod by running bor.exe in the bor_mod directory.
You can easily create your own pack file directly into the directory in which your copy of Beats of Rage is installed.
General remarks
When your custom pack file is finished, you may run your mod by using the following syntax:
bor.exe -pak mymod.pak where mymod.pak is the name of your pack file.
Please note that you need at least version 1.0024 to use alternative pack files.
The Beats of Rage program does not distinguish between slashes and backslashes, so in all text files you may use either one (data\\sounds\\pop.wav is the same as data/sounds/pop.wav).
Also do not use long file names in your Beats of Rage mod, since it is a DOS game. So use a maximum of 8 characters in file names.
Step 1. Creating Gifs
Grabbing frames
In order to make a new character you need sprites for your character. On the internet many ripped sprites can be found, however these are often modified and manhandled. You'll probably get better sprites if you grab them yourself. Also this ensures you can get the sprites you need.
The best program to do this is probably neorage, because you can easily select layers and change the background colour in the shots factory (so you can make good grabs of characters with black in their outfit).
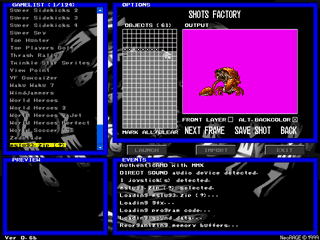
neorageX shots factory
Off course other emulators work also work. For instance Kawaks has a shots factory (Tools, shots factory) and can change the background clour (video, set background color).
Editing frames
When you've got the character frames of your fancy, you need to process the large images (about 320x240 when grabbed from a Neo Geo) to sprites.
Remember that you give frames of the same animation (e.g. an attack) the same width and height, this makes it easier in a later stage. For instance when creating an attack for Ralf, you need to make sure that frame 1 is large enough so that Ralf's outstretched arm is still visible in frame 2.
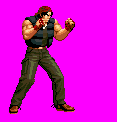
Frame 1
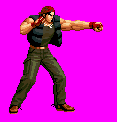
Frame 2
Notice that the pink colour is used as the transparent colour. The exact properties of this colour are R:252 G:0 B:255 or #FC00FF.
Saving frames
When you have cropped the frames to the right size, you need to save them as gifs, using the BOR palette (data/pal.act). In Photoshop 5.5 you do it like this:
1. Go to File "Save as", select CompuServe GIF (*.GIF)
Do not use long file names, but a maximum of 8 characters.
2. Go to Palette and choose "Custom"
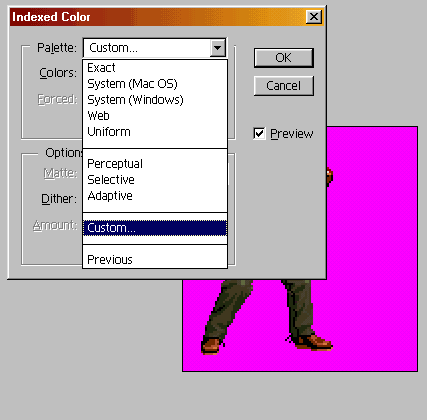
3. A colour table pops up, here you press load. Select data/pal.act and press load. Also set Dither to none.
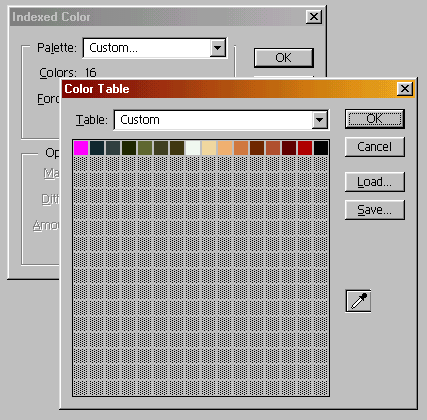
4. The BOR palette was loaded. You should see this:
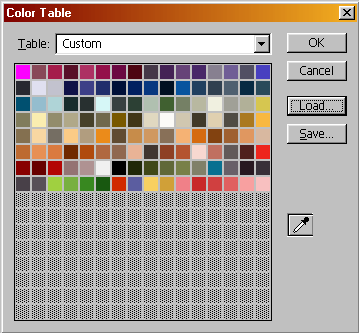
Now press ok, and ok again.
5. Now you are asked to choose between normal and interlaced row orders. Choose normal. Now your frame has been saved.
Once you have loaded your palette, you can choose previous palette the next frame you save.

Step 2. Assigning properties to your character
Default properties
All character properties are found in the character.txt. For Ralf this text file is located at data\\chars\\ralf\\ralf.txt.
You can write comments in this text file by writing a "#" before your comment. With the number sign the computer will not process this text as a command. Also useful is that you can both use the "/" and the "\\" in the file locations.
At the top of the file you'll find the following properties:
| name Ralf | Standard name for this character. |
| health 55 | Standard health for this character is 55. |
| speed 7 | Standard speed for this character is 7. Increase this number to make the character walk faster. |
| type enemy | Write "enemy" to make an enemy, "player" for a hero, "obstacle" for boxes etc., "item" for items (apple, 1up etc.), and "none" for things as stream. |
| shadow 4 | Shadow size is 4. Increase the number for a bigger shadow. Maximum shadow size is 6, and 0 for no shadow. |
| icon data/chars/ralf/icon.gif | Location of the icon image (the image next to the health gauge). |
| diesound data/sounds/die1.wav | Location of the sound the character makes when he dies. |
| remap data/chars/ralf/idle1.gif data/chars/ralf/map1.gif | This function lets you have alternative character colours. The first file points to the image with the original colours. The second file points to the same frame but with alternative colours. |
Animation
Next the actual animations will be constructed. There are a number of different animations.
| anim idle | The animation for standing still. |
| anim walk | Err, well... walking. |
| anim pain | When your character gets hurt. |
| anim fall | When the character gets knocked down, he falls. |
| anim rise | And getting up again. |
Things you need to know about animations
When creating animations it's best to look carefully at existing characters, and how they work. Here is a rundown of all the properties the animations can have.
| loop 1 | Use 1 for repeating animations, such as walking and idle. Use 0 for single animations that don't repeat until you press the button again, such as attacks. |
| offset 39 121 | The offset is the place where the character will stand and the shadow is placed. This is a single point in the frame. Here x-coordinate=39 and y=121. |

The offset is depicted here as a white pixel. This pixel is only here to demonstrate the offset point. Do not put a pixel in the actual frame!
An easy way to find the coordinates in Photoshop is to look at the info box. 
| | |
| bbox 22 23 34 99 | The bbox is the area where the character can be hit. The first 2 numbers (22 and 23) are the x and y coordinates of the topleft point of the area. The third number (34) is the width of the bbox, and the fourth (99) is the height. |

The bbox is depicted here as a white box. This box is only here to demonstrate the bbox. Do not put a white box in the actual frame!
| delay 10 | The speed in which the frames follow each other, the delay is given in 100ths of a second. Increase the delay to slow down the animation. |
| sound data/sounds/maxboom.wav | Characters can also make sounds during animations. The sound will play a soon a the animation reaches the point where the sound is declared. |
The offset, bbox, attack and delay remain active for all following frames until they are changed.
| frame data/chars/ralf/idle1.gif | The locations of the actual frames. Put these in the right order. |
Attacks
Each enemy can have up to three normal attacks plus a throw, uppercut, special, and jumpattack. A normal attack is called "anim attack1" (or 2 or 3 of course).
| range 0 70 | If a hero is within this range the character can perform this attack. The range is given in pixels and is measured from the offset point. |
| attack 56 17 47 21 10 0 | The first 2 numbers (56 17) give the x and y coordinates of the attack box. Number three and four (47 21) are the width and height of the box. The fifth number (10) is the strength of the attack. Increase this number for a heavier attack. The sixth number (0) is used to define whether the hero falls down after the attack. Use 1 for fall down, and 0 (or leave it out) not to have the hero fall down. Set the attack to 0 0 0 0 0 0 when the attack frames are over. |

The attack box is depicted here as a white box. This box is only here to demonstrate the attack area. Do not put a white box in the actual frame!
Uppercut, throw, and special attacks
The uppercut (anim upper) works a normal attack, but it does not have a range. It will start automatically when a hero jumps. The throw (anim throw) also works as a normal attack, but it will happen when a hero walk into the enemy.
The special does have a range, but it will only happen when a hero holds the character for a certain amount of time, so the enemy character can escape its hold.
The jumpattack (anim jumpattack) works as a normal attack, but the character jumps during the attack. This will happen automatically when you use "anim jumpattack".
There is yet one more attack. The shoot attack, which is really a normal attack, but you shoot something. Take Rugal for example; he can shoot a wave. To have this work you must write "load Shot" in the top partition of the character text, in this case Rugal.txt. (Or load knife, if you want a knife).
You also have to define a shootframe in the actual attack animation.
| | |
| shootframe 5 | In this attack the character will shoot a wave/knife in the 5th frame in the animation. Place this in the Character.txt |
Because the shot is a new entity it has its own animation frames and text file. These can be found under data\\chars\\misc\\shot.txt and data\\chars\\misc\\knife.txt
Heroes
The heroes/players work basically the same as the enemies, they just have some extra animations.
| anim get | Animation to pick up items. |
| anim special | This is the special attack the costs a bit of health. Don't give this animation a bbox, because you need to be invincible for a period. |
| anim freespecial | This is the forward, forward+punch special |
| anim jump | This is the jump. Don't give this animation an attack, because heroes can jump without attacking. |
| anim jumpattack | This is the attack that knocks enemies on the ground during a jump. Notice that you are already in the air at this point, so you don't need any animation for jumping off the ground. |
| anim jumpattack2 | This is the air attack that leaves your enemies standing. Notice that you are already in the air at this point, so you don't need any animation for jumping off the ground. |
| anim grab | The animation for holding an enemy, you're not actually throwing yet. |
| anim grabattack | The animation for pummelling an enemy while holding him. |
| anim grabattack2 | The animation for pummelling an enemy and knocking him on the ground. |
| anim throw | Throw your enemy! |
| anim land | Heroes have an extra animation for safe landings. |
Step 3. Models.txt
In order to actually put your character in the game you must first let BOR know the character should be loaded. This is done in the data/models.txt . Use the phrase "load" for heroes. These will always be loaded.
Example
load Kula data/chars/kula/kula.txt
Use the phrase "know" for all other entities, such as enemies, items etc. These will only be loaded if they actally appear in the level.
Example
know Ralf data/chars/ralf/ralf.txt
Don't forget to make the knives, shots etc. be known in the models.txt.
1. Putting the graphics and music in a level
Define the following properties at the beginning of the level file.
| music data/music/saviour.bor | Give the command music and the location of the music. This music will be played, and looped during the level. Optional |
| bossmusic data/music/1boss.bor | The bossmusic will start to play when a boss is spawned. If you don't use bossmusic the regular level music will keep playing. Optional |
| hole [scrollpos] | A hole will be made at the defined scrollposition at the bottom of the level. (More about the scrollpos at the end of chapter 2). Optional |
| endhole 1 | The level will end with a hole from top to bottom when all the level is out of panels, as defined in the "order". Useful for elevators. Optional |
| background [path] |
Specify the location of the background image to use in the level. This should be a 256-colour image. The first 128 colours in the palette (index 0-127) should be equal to those of the global palette (more info on this subject can be found on the character page). The other colours (index 128-255) may be used at your discretion (except if you use neon panels, see below). |
| water data/bgs/boat2/water.gif 15 | Define an image to use as water. This image will be placed directly under the background image (see above). If "rock" is enabled (see below), the water surface will be drawn as a plane (as in level 3). If not, it will be warped with a sine (as in level 4). You may also define the strength of the sine deformation. 15 is a good value. Optional |
| rock 1 | The entire level will move slightly up and down, just like a boat :) Optional |
| panel [path] [path] [path] | Specify the images to use as "panels". These are the sections that make up a level. A panel is normally 244 pixels high, and can have just about any width. It is advised, however, to use a width of 100 or 200 pixels. This way you can easily determine the width of your entire level by counting the panels. If you're making a boat level, panels should be 256 pixels high because the level will move up and down a bit. All panels in the same level should have the same dimensions. Panels are drawn as sprites, i.e. the first colour in your palette (index 0) will be transparent. You may specify three paths: The first one defines the image to be displayed in normal mode. The second one defines the image to be displayed in neon mode. The third one defines the image to be displayed in screen mode. It is advised to prevent overlapping of the three images, as it is a waste of CPU time. Images displayed in neon mode will be remapped as follows: colour index 128 through 135 will be cycled two steps, three times per second. You can use this to create blinking lights. To use the neon effect properly, you'll need to have some understanding of working with palettes and palette rotation. Images displayed in screen mode will appear translucent. It is implemented in the same way as Photoshop's screen mode: Black is fully transparent, and white is fully opaque. You may use this to create stuff like windows or coronas. If you do not want to use a specific kind of panel, enter "none" as the path (without the quotation marks). The maximum number of panels per level is 26. Example: panel data/bgs/bridge/bridge10.gif none none Mandatory |
| order abcd | The order in which the panels appear in the level. This also defines the width of the level. The maximum length of the order is 1000. However, you cannot specify that many characters on a single line (about 100 max). So if you want to make a very big level, distribute the order over multiple lines, like so: order abcd order efgh order abcd order ijkl Mandatory |
| frontpanel data/bgs/street/f00.gif | Like the aforementioned panels, only much simpler. You cannot specify any front panels to be displayed with any effects. Front panels will be displayed in front of all other sprites (except the status window). The maximum number of front panels is 26. Optional |
| direction [direction] | You may specify a direction for levels to scroll in. Valid directions are up, down, left and right. Up and down are used for elevators, obviously. By default, levels scroll to the right. Optional |
| mirror [0/1] | When mirror mode is enabled, the program will draw copies of all objects between the panels and the background. You may use this to create mirrors on the walls (as seen in level 6). Optional |
2. Putting the enemies in.
After creating the backgrounds for your level, you can start putting in the enemies, objects, and items. There are a number of things you can do in a level. We'll first start with adding enemies, objects, and items. When a property for a "character" is used, remember that this also applies for objects and items.
| spawn [id] | Command to spawn a character, object or item in a level. The id is the characters name a defined in the character.txt. Mandatory |
| alias [name] | Change the displayed name. If you don't use this the name defined in the character.txt will be used. Names consisting of more parts must be connected with an underscore (e.g. Timmy_Turner) Optional |
| map [num] | This changes the colourmap for this character, as defined in the character.txt. E.g. Ralf has 3 remap colours. If you don't define the map, it will take the standard colour. Optional |
| health [num] | This changes the health of the character. When it is not used, the standard health for this character will be used. Optional |
| item [id] | Only obstacles can contain items, and only one item. However items can also be spawned without an obstable. Simply state "spawn 1up" (for instance). Optional |
| 2pitem [id] | You can also have items that will only be spawned when 2 players play simultaniously. use 2pitem for this. Optional |
| boss [0/1] | Use 1 for a boss, and 0 for a regular enemy (or leave it out). You can have multiple bosses, but once a boss has been defeated the level ends. Optional |
| flip [0/1] | 0 = face left, 1 = face right. With this you can flip a character horizontaly, only useful for objects. Optional |
| coords [num] [num] | These are the coordinates at wich the character will spawn relative to scroll posistion. The first number is the x coordinate, the second number is the y coordinate of the screen. So to spawn a character in the top left of the screen you need coords 0 160. Between x coordinates 0 and 320 an enemy will fall out of the air (objects and items suddenly appear). To have a character walk into the screen you must use a x coordinate of about 350 (to let him walk in from the right) of -30 (to let him walk in from the left). Use a larger x coordinate for biker-k's (e.g. 400), because of their speed. Mandatory |
| at [scrollpos] | Use this to give the position in the level when the character should be spawned. The number can range from 0 to the end of the level. E.g when the scrollpos is 700 the character will be spawned after the hero walked through a little over 2 screens. Mandatory |
Example of a spawned character
| spawn ralf alias Timmy_Turner map 1 health 45 coords -30 210 at 700 |
3. Other commands
| wait at [scrollpos] | This blocks scrolling until all enemies, that were spawned prior to the wait, are defeated. |
| group [min] [max] at [scrollpos] | If the number of enemies drops below [min], more enemies will be spawned (if possible). No more than [max] enemies will be present. So, to make enemies appear in groups of four, use this: group 1 4. To make them appear normally, use this: group 100 100. Waits, objects and items do not count in a group AFTER they have been spawned. Before spawning, they do count. So if you work with a small group (e.g. group 1 2), a wait will only be spawned when only one enemy is left. Therefore it is best to us groups only when a wait is already active. |
Example of a bad grouping
| group 2 2 at 700 spawn ralf coords -30 210 at 700 spawn ralf coords 380 210 at 700 spawn ralf coords 380 210 at 700 wait at 700 |
There will always be 2 enemies present, until all are defeated. So if you don't defeat 2 enemies, the wait will not become active, and the player can keep walking.
So you should do it like this:
Example of a good grouping
| wait at 700 group 2 2 at 700 spawn ralf coords -30 210 at 700 spawn ralf coords 380 210 at 700 spawn ralf coords 380 210 at 700 |
4. Levels.txt
In data\\levels.txt the order of the levels are defined. And here's how you do it.
| set [name] | Start a new set of levels (e.g. "easy" or "normal"). |
| file [filename] | Specify the location of a level file. |
| next | Go to next level (show "stage clear" and stuff). |
| scene [filename] | Give the location of a scene, and it will be shown. |
The scenes, such as the intro and ending, are simply animated gifs. Thus to add your own scenes you need a gif animator. For instance, you can download the Microsoft GIF Animator for free here: http://download.microsoft.com/msdownload/gifanimator/gifsetup.exe
If you have an animated gif, no bigger than 320x240 pixels, place it in data\\scenes\\
However it is possible to use smaller animations.
When you have placed the animation in the scenes directory you need to create a text file in the same location. In this text file you can define the music and offset for the animation (the offset is useful when using smaller animations than 320x240).
| music data/music/time.bor 1 | Define music, then give the location of the file. The 1 means the music will loop if it stops before the animation has ended. use 0 not to loop the music. The intro music is a special case, and this file must be called remix.bor. |
| animation data/scenes/falla.gif 0 0 | First define that is an animation, then give the location of the file. The two number are the x and y coordinate of the topleft of the animation. Use 0 0 for animations that are 320x240, for smaller animations you can edit the coordinates to get the animation centered. Notice that you can play a number of animations in one scene. |
If you use a scene consisting of only one image (for instance "thank you for playing"), make sure that you give it a delay, using a gif animation program. Otherwise the image will only appear for 1/10th of a second.
You can also change the introscreen and character select screen. These files can be found in data/bgs/. Please note that scenes and most screens do not need to be saved with the bor palette; they can have their own palette. However, you must make the first colour (index 0) black.
The exception is the character select screen, which must have the bor palette (because your characters will appear on this screen, obviously). Also, screens where text is displayed should have your font's colours in their palettes at the correct indexes.
Entering the scene in the game
You can play these scenes in BOR by typing the location of the scene.txt in the \\data\\levels.txt.
Example
scene data/scenes/ending.txt
The Beats of Rage edit pack contains a program to convert WAV files to BOR files. BOR files are the standard by which Beats of Rage plays its music. In this standard, a simple ADPCM algorithm is used to compress/decompress the audio.
To create your own music files for use in you mod, you must first create a WAV file containing a loop. Save this file with the following properties:
| Format: | PCM |
| Bit-depth: | 16-bit |
| Channels: | mono |
| Sample frequency: | 22050 (22 KHz) * |
The easiest way to convert your WAV file is probably by creating a batch file (*.BAT). To do so, simply create a text file and rename it to convert.bat (or grampa.bat or eatme.bat or whatever).
Enter a command into the batch file according to the following syntax:
wav2bor.exe [wav-file] [bor-file]
Example:
wav2bor.exe mymusic.wav mymusic.bor
Now execute the batch, and your file will be converted in mere seconds.
To learn how to enter the music files into the game, read about levels and scenes.
Note: some music files are required. See the list of required files.
Note 2: You may also enter an artist and title to be saved with the BOR file:
wav2bor.exe [wav-file] [bor-file] [artist] [title]
Replace spaces by underbars (_). At this time, this information is not displayed in the game, but this feature may be added in future releases.
Sound files in Beats of Rage should be saved as WAV file, with the following properties:
| Bit-depth: | 8-bit |
| Channels: | mono |
| Sample frequency: | Anywhere from 11025 (11 KHz) to 44100 (44 KHz) * |
Note: some paths to sound files are hard-coded into the Beats of Rage program. See the list of required files.
Some files must be present in your pack file for the game to function properly. They are listed below:
data/music/complete.bor
data/music/gameover.bor
data/music/menu.bor
data/music/remix.bor
data/sounds/beat1.wav
data/sounds/fall.wav
data/sounds/get.wav
data/sounds/money.wav
data/sounds/jump.wav
data/sounds/indirect.wav
data/sounds/punch.wav
data/sounds/1up.wav
data/sounds/timeover.wav
data/sounds/beep.wav
data/sounds/beep2.wav
data/sounds/bike.wav (if you use motorcycles)
data/sprites/arrow.gif
data/sprites/font.gif
data/sprites/font2.gif
data/sprites/font3.gif
data/sprites/font4.gif
data/sprites/hole.gif
data/sprites/shadow1.gif
data/sprites/shadow2.gif
data/sprites/shadow3.gif
data/sprites/shadow4.gif
data/sprites/shadow5.gif
data/sprites/shadow6.gif
data/levels.txt
data/models.txt
data/pal.act
data/scenes/logo.txt
data/bgs/logo.gif
data/bgs/select.gif
data/bgs/title.gif
data/bgs/titleb.gif
BOR is also available for the Dreamcast, ps2, and xbox. And you can play your mod on a console!
Memory restrictions
Since consoles have a certain amount of memory, there's maximum amount of data you can use for your mod if you want it to work on a console.
| Dreamcast | Playstation2 | Xbox | |
| Memory used in official pack | 12 MB | 22 MB | probably 22MB |
| Total memory | 16 Mb | 32 MB | 64 MB |
| Estimated max characters* | 36 | 42 | 90 |
Some words from Neill Corlett on mods for DC and PS2
1. Memory usage is kind of tight, especially since BoR doesn't seem to free certain resources between levels. (I'm not sure of this since I didn't examine bor.c too thoroughly - because BoR is so nicely designed and modular, I didn't need to.) By the time you finish the game, the Dreamcast version is using 12MB (out of 16MB) and the PS2 version is using 22MB (out of 32MB). I don't think this is a memory leak per se, since it doesn't go up any further if you go through the game again.
The behavior isn't entirely friendly if you run out of memory, either: The DC version will simply lock up, although if you're using dcload, you'll get a "Heap and stack collision" message on the console. The PS2 version will show a "Out of memory!" or similar message in the upper-left corner of the screen in the ugly DevCons font.
2. The .PAK directory info is cached in memory at all times, and its total size can't be bigger than about 256K. If I remember right, it's currently 61K, so this shouldn't be a problem unless you're doing an incredibly ambitious mod.
3. The console versions don't look for the "PACK" or version signature, because I thought this was unnecessary and it would just add an extra needless seek to the beginning of the file.
4. I'm not entirely certain that BMP loading works; I had to redo its header routine extensively and I'm not even sure if the default BOR.PAK uses any BMPs at all. So steer clear of BMP if you can.
5. The loose file structure won't work on ps2 and Dreamcast, so use a pak file in your mod for dc/ps2.
Making a Selfbooting Dreamcast disc
special thanks to CEDRIC
Step 1
Extract 'Selfboot', you can find it in consoles\\selfboot.exe. It must be installed in C:\\Selfboot.
Step 2
Place your bor pak in 'Consoles\\Dreamcast\'. Rename it from mymod.pak to bor.pak
In this directory you should also find a Ip.bin and 1st_read.bin.
Step 3
Run Selfboot.exe and select the directory Consoles\\Dreamcast\\. If you use NERO click the NERO (DAO) or NERO (TAO) button to create a .nrg image (use DAO if your burner supports it). If you use DiscJuggler click the DiscJuggler button to create a .cdi image. If you want to burn with CDRecord select CDRecord, click burn to burn the audio track (make sure there is a blank CD in your CD writer), click Msinfo, click Make Iso to build the image, then click Burn to burn the second session.
Step 4
Burn the NERO or DiscJuggler image with the appropriate program.
Making a disc for PS2
Hmm, I actually don't know how to make a booting ps2 disc, since I don't have a ps2. Perhaps the mod-chip enables you to simple put the files on a disc and and it'll work. Who knows?
Still, don't forget to add bor.pak to the cd.
Run your mod on Xbox
1. Rename your mymod.pak to BOR.PAK.
2. Upload the your BOR.PAK file to a directory on your XBox
3. Upload the DEFAULT.XBE file to the same directory on your XBox (you can find this file in Consoles\\Xbox\\)
4. Run the DEFAULT.XBE file
To inform those who run into the limitations of BoR, or fear that they might, here are some lines from the source code.
| #define | MAX_SPRITES | 2000 |
| #define | MAX_ANIMS | 500 |
| #define | MAX_MODELS | 100 |
| #define | MAX_PANELS | 26 |
| #define | ANI_MAX_FRAMES | 26 |
| #define | MAX_COLOUR_MAPS | 7 |
| #define | MAX_NAME_LEN | 20 |
| #define | LEVEL_MAX_SPAWNS | 300 |
| #define | LEVEL_MAX_PANELS | 1000 |
| #define | LEVEL_MAX_HOLES | 20 |
| #define | MAX_LEVELS | 50 |
| #define | MAX_DIFFICULTIES | 5 |
| #define | MAX_SOUND_CACHE | 64 |
| #define | MAX_FILES | 3000 |
The limit of 2000 sprites means that you cannot use more than a total of 2000 sprites for all character models combined. In other words, if you perform a file count on your data/chars directory, and it comes up with a number greater than 2000, you could have a problem (especially if you double-loaded some images).
You cannot load more than 500 animations. Same deal as with the sprites, but unfortunately you can't count them as easily as with the sprites.
The maximum of 100 models corresponds to the number of text files in your data/chars directory, so these can be counted quite easily. BoR uses about 40 of them in the default pack.
The maximum number of background panels that can be loaded is, logically, 26, since you set the order with the tokens A through Z.
ANI_MAX_FRAMES indicates that you can use no more than 32 frames in an animation.
Well, I think you get the idea for the rest of them as well. The default pack file that comes with BoR rarely uses more than half of any of these values, so you should be able to make a mod about twice the size of the original. Which is pretty big, isn't it?
MAX_FILES indicates that the total number of files in the packfile has a maximum of 3000.
When I try to edit my mod BOR just crashes/ I don't see error messages.
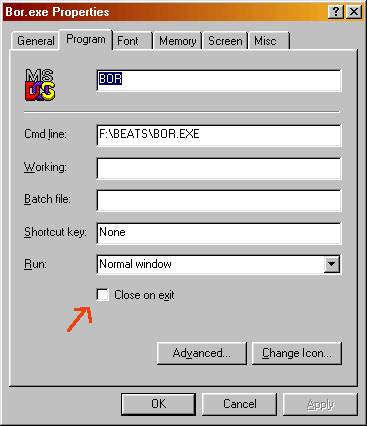
BOR is unlikely to just crash, it probably encountered an error in your mod and exits the game, displaying an error message. In some windows configurations, windows closes all finished dos programs immediately, preventing you to see the error message. To make sure you can see the error messages do the following:
1. right click on bor.exe, and select properties.

2. click on the tab 'program' and make sure that the check box 'close on exit' is unchecked.
I made a new enemy, but when I turned him into a hero it won't work.
A number of things may cause this problem. First a hero has more moves, which need to be in the character.txt (e.g. kula.txt). So when making a new hero, first copy an existing text file of a hero and start replacing frames with your own. This way BOR will always find all the moves it expects.
Also make sure the character has been given the proper 'type' in the character.txt (type player). Finally all new characters need to be declared in the models.txt.
BOR won't use my gifs.
BOR can't handle long file names, so give files a name consisting of a maximum of 8 characters (e.g. 12345678.gif).
The colours of my character are displayed wrong.
BOR uses a fixed palette for characters, so you can't use colours that are not in the palette. So next time save the gifs using the bor palette (data\\pal.act).

