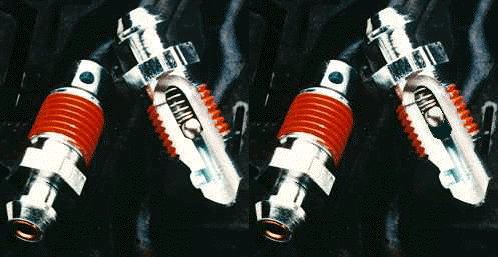
Speed bleeders
From 2nd Generation Rx7 Service Wiki
| Line 27: | Line 27: | ||
#Carefully thread the new bleeder into the socket. Be very careful not to cross thread the socket. The front calipers are aluminum and it doesn't take much to screw them up. | #Carefully thread the new bleeder into the socket. Be very careful not to cross thread the socket. The front calipers are aluminum and it doesn't take much to screw them up. | ||
#Tighten the bleeder in the socket | #Tighten the bleeder in the socket | ||
| + | |||
| + | ===What to Bleed=== | ||
| + | Now that you have all the supplies together you need to figure out which components you wish to bleed. It is unnecessary to bleed the entire system when replacing a single component, just the section effected by the replacement. There is no harm in bleeding the entire system, but if you don't have to you can save a bit of time. If you decide that it's necessary to bleed the entire system, use the following chart to determine the proper bleeding order (eseentially the furthest point from the master cylinder gets bleed first then goes in order by distance.) | ||
| + | |||
| + | [[Image:Brake_bleeding_order.gif]] | ||
| + | |||
| + | If you're bleeding a rear caliper that has been replaced or rebuilt you must use the lower of the two bleeder screws before bleeding from the upper screw. This will ensure that no air is trapped in the lower passages of the unit. Follow the conventional instructions if this is the case, then return here and continue using the Speed Bleeders. | ||
===Speed Bleeder Bleeding=== | ===Speed Bleeder Bleeding=== | ||
| Line 32: | Line 39: | ||
#Jack the vehicle up, remove the wheels | #Jack the vehicle up, remove the wheels | ||
| - | # | + | #Loosen the bleeder just enough to allow the fluid to escape (should be ~1/4 turn) |
| + | #Attach the vinyl tubing to the bleeder, then place the other end into your catch container | ||
| + | #Pump the brake pedal until no air bubbles come out of the unit. | ||
| + | #Remove the tube, then tighten the bleeder so it's snug. <b>Do not overtighten or you will damage the caliper and bleeder.</b> | ||
| + | |||
----- | ----- | ||
[[Category:Braking System]] | [[Category:Braking System]] | ||
Revision as of 04:29, 29 March 2006
Speed Bleeders are produced by Speed Bleeder Products Inc. located in Newark, IL. The feature an internal check valve which makes bleeding brakes extremely easy. All you must do is crack the valve open, pump the pedal until no more air leaves the system, then tighten it until it seats again.
Contents |
Sizing and Ordering
Sizes required are:
- S4 GTU, GXL, GTUs, Turbo = xxmm front, xxmm rear
- SE and S5 GTU = xxmm front, xxmm rear
Speed Bleeders can be ordered directly from the manufacturer's website at http://www.speedbleeder.com/ or can be found in any number of catalogs, including Victoria British.
Using Speed Bleeders
The first thing you'll need to do is install the Speed Bleeders into your calipers. The installation is very simple and straight-forward.
Tools and Supplies
You will need the following to complete the job:
- Flare wrench that fits Speed Bleeder
- 3-4 ft. of clear vinyl tubing that will fit snugly over the bleeder
- Catch container
- Fresh brake fluid
Speed Bleeder Installation
- Jack the vehicle up, remove the wheels
- Remove the bleeder from the caliper using a flare wrench (a normal wrench will strip the bleeder.) On the rear calipers, only remove the upper bleeder
- Carefully thread the new bleeder into the socket. Be very careful not to cross thread the socket. The front calipers are aluminum and it doesn't take much to screw them up.
- Tighten the bleeder in the socket
What to Bleed
Now that you have all the supplies together you need to figure out which components you wish to bleed. It is unnecessary to bleed the entire system when replacing a single component, just the section effected by the replacement. There is no harm in bleeding the entire system, but if you don't have to you can save a bit of time. If you decide that it's necessary to bleed the entire system, use the following chart to determine the proper bleeding order (eseentially the furthest point from the master cylinder gets bleed first then goes in order by distance.)
If you're bleeding a rear caliper that has been replaced or rebuilt you must use the lower of the two bleeder screws before bleeding from the upper screw. This will ensure that no air is trapped in the lower passages of the unit. Follow the conventional instructions if this is the case, then return here and continue using the Speed Bleeders.
Speed Bleeder Bleeding
- Jack the vehicle up, remove the wheels
- Loosen the bleeder just enough to allow the fluid to escape (should be ~1/4 turn)
- Attach the vinyl tubing to the bleeder, then place the other end into your catch container
- Pump the brake pedal until no air bubbles come out of the unit.
- Remove the tube, then tighten the bleeder so it's snug. Do not overtighten or you will damage the caliper and bleeder.


